Εμφάνιση αναρτήσεων με ετικέτα TRV-22. Εμφάνιση όλων των αναρτήσεων

Τρίτη 18 Σεπτεμβρίου 2012

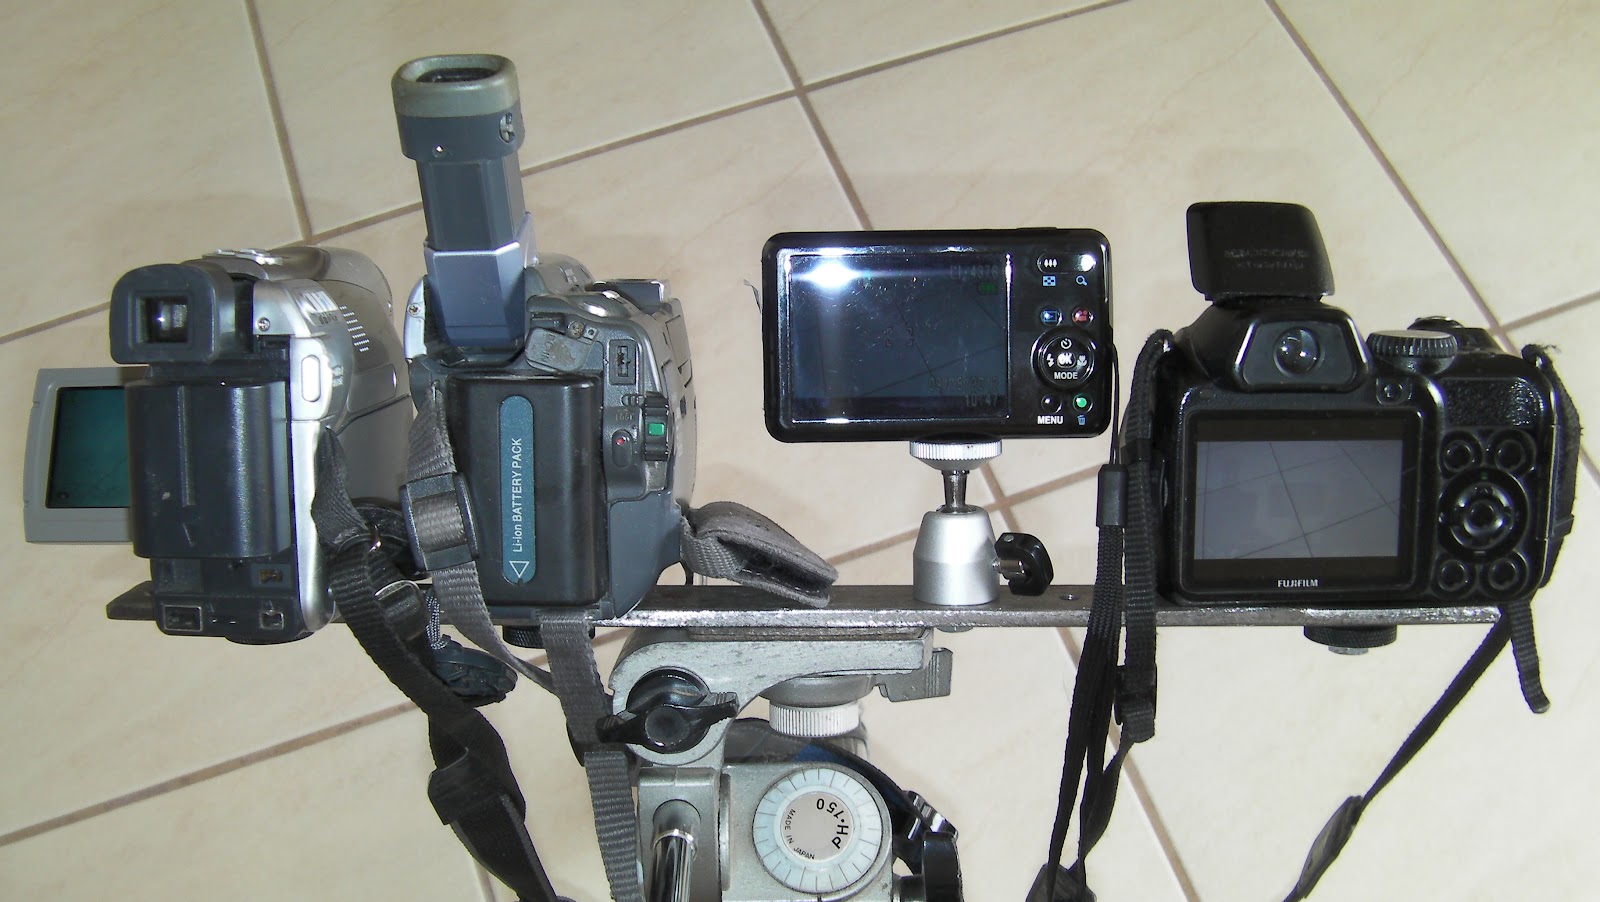
REMOTE CONTROLLED CAMERA ARRAY

I really like remote controlled cameras. Unfortunatelly, affordable ones are very rare these days (like Pentax Optio S1) . An infrared remote control was considered standard accessory during the good old days of  mini-dv and other  tape camcorders but now one has to try hard to find the little red-purple  piece of plastic at the front face of contemporary video equipment.
So,I  decided to make an arduino infrared remote controlled camera array . An arduino prototype board with an infrared led and two servos controls at least four different pieces of video equipment and has a few  options useful for nature and wild life photography as well.  A motorized camera rig is on the way.
Oblique view of the  camera array

Rear view of the camera array
Camera array in action


Arduino sends infrared remote codes to the cameras in order to control functions like shutter press/release, zoom in /out, snapshot recording and video recording toggle. Arduino infrared is controlled remotely by either by a  PWM R/C remote control , a serial  digital link (or Xbee) ,  a 433MHZ 4-Channel  button remote control or locally using butons on the arduino board itself. Even two servos can be connected on the board to control shutter and zoom in manual-only cameras. A relay output and an user configurable input can be connected to a PIR detector or an infrared barrier.
A "hacked" 433MHZ radio link -we just get TTL Rx/Tx signals and 5V to feed  Arduino

Arduino infrared prototype feeded by a  7.4V  LiPo (5400mah!!) , a 3A/ 5V swiching regulator, and a hacked 433Mhz serial link . Bottom center is the Infrared led and one of the two optional servos for shutter and zoom functions.  

The not-so-innocent cheap helicopter model remote control and hacked  433Mhz serial receiver. Everything inside original remote  was discarded and a 433Mhz serial link (the same as the receiver) was added  together with an arduino mini at 16 Mhz, another  two axis left joystick and two extra buttons below it.  Power comes from  4 NimH batteries and a 5V/3A switching regulator,  Line-of-view range is about 300 meters.  

Arduino infrared prototype is controlled by an -also hacked - 4-channel 433 Mhz garage door  receiver. The minimalistic remote shown on the right has a line-of-view range of 300 meters ! It can control shutter , Video recording and Zoom functions of every camera in  the array.   

 2 channels of a common  PWM R/C receiver are connected to the arduino prototype. We can control  shutter , Video recording and Zoom functions of every camera in  the array also,  using flap  (CH6) switch for shutter and Video record toggle, and  throttle (or elevator) joystick (CH3/CH1) for Zooming functions.     

Another useful option is the built-in intervalometer   which takes time-lapse videos like this one :

You can see a FHD of the above video if you click on the following  link :
or this one :


Σάββατο 10 Σεπτεμβρίου 2011

RECHARGEABLE BATTERY QUALITY MONITOR

       Using micro-controllers one can easily (!!!) make an intelligent rechargeable battery monitor in order to check if his NiMh or Nicads are in good condition. Let's take my favorite Arduino for example. It has 6 analog ports, so we can take a six battery holder, cut all inter-cell connections (they are connected in series), put a resistor in series with each cell (it we are keeping it simple - a current source would be much better) and measure and log the voltage as it drops through the resistor. We could also program some kind of Processing script to display the results graphically on the computer.
       Well, I used a different - and  faster approach. I used my intelligent 10-cell charger and my Sony TRV-22 DVR in photo mode and its simple intervalometer. TRV-22 can take photographs every 1, 5 or 10 minutes in memory stick (120 photos 640x480 resolution on 8MB memory stick)  I fully charged the batteries and then discharged them , photographing the charger's leds every 10 minutes. When a cell is being discharged a red led flashes slowly  and when discharging is over it lights steadily until full charge when it  finally becomes green. The fist discharged battery is the weakest and the last one has the maximum amount of energy. In the following time- lapse video you can see that batteries 8 and 9 are the first to begin charging (that means that are the first to discharge - the ones with the less energy) because their leds lite steadily first of all the others. Battery number 3 is the best because its charging begun 2h 45' after no's 8 and 9 (by examining the EXIF metadata in every pictures file).
      Night vision is enabled on TRV-22 because most of the process took place at night. Here is a video of the discharging sequence :  


The above procedure can also be accomplished with a web cam and a capture program with intervalometer function. There are a few free ones on the web. Timing error if 10 minute interval is used is +/- 10min. Following time lapse video shows charging sequence :


Δευτέρα 5 Σεπτεμβρίου 2011

INFRARED REMOTE CONTROL CODE HACKING FOR AUDIO - VIDEO DEVICES

Remote controlling audio-video devices like cameras, DVR's , VCR's is one of my favorites.
Imagine remote controlled  pan - tilt cameras for wildlife photography, target acquisition etc !!

SONY DVR TRV22E-TRV11E infrared remote control hack

At first a pulse of 2.4ms (of 38khz)  must be send followed by a 600us pause
"1" (38KHZ ) duration is 1200us, "0" (38KHZ)  is 600us and inter-digit (pause) duration is 600us.
After last bit we have a pause of 19.5ms.  Each pulse train  must be send 3 times.


{1,0,0,1,1,0,0,1,0,0,1,1,1,0,1}   Start-Stop Recording
{1,0,1,0,1,0,0,1,0,0,1,1,1,0,1}   Snap Shot
{0,1,0,1,1,0,0,1,0,0,1,1,0,1,1}   Zoom In
{1,1,0,1,1,0,0,1,0,0,1,1,0,1,1}   Zoom Out


JVC GRD-240E DV camera infrared remote control hack

At first a pulse train  of 8,8ms (of 38khz)  must be send followed by a 4ms pause
"1" (pause ) duration is 1500us, "0" (pause)  is 600us and signal (38KHZ) duration is 600us.
After last bit we have a pause of 17.5ms. Each pulse train  must be send once.

{1,1,0,0,1,0,1,1,1,0,0,1,1,0,1,0}   Start-Stop Recording
{1,1,0,0,1,0,1,1,1,1,1,0,0,1,1,0}   Power Toggle
{1,1,0,0,1,0,1,1,1,0,1,1,1,0,1,0}   Snap Shot 
{1,1,0,0,1,0,1,1,0,1,0,0,1,0,1,0}   Zoom In
{1,1,0,0,1,0,1,1,1,0,0,0,1,0,1,0}   Zoom Out

Fujifilm Finepix S2000hd infrared remote control hack
At first a pulse of 9,2ms (of 38khz)  must be send followed by a 4.48ms pause
"1" (pause ) duration is 1620us, "0" (pause)  is 600us and signal (38KHZ) duration is 580us.
After last bit we have a pause of 40.6ms. Each pulse train  must be send once.


 {1,1,0,1,0,0,1,1,0,0,0,0,1,1,0,0,0,1,0,0,0,0,0,1,1,0,1,1,1,1,1,0}  PHOTOS |>
{1,1,0,1,0,0,1,1,0,0,0,0,1,1,0,0,1,1,1,0,0,0,0,1,0,0,0,1,1,1,1,0}  MENU / OK
{1,1,0,1,0,0,1,1,0,0,0,0,1,1,0,0,1,0,0,1,0,0,0,1,0,1,1,0,1,1,1,0}  FUNCTION
{1,1,0,1,0,0,1,1,0,0,0,0,1,1,0,0,0,0,0,1,0,0,0,1,1,1,1,0,1,1,1,0}  DISP / BACK
{1,1,0,1,0,0,1,1,0,0,0,0,1,1,0,0,1,0,1,0,0,0,0,1,0,1,0,1,1,1,1,0}  Right Arrow
{1,1,0,1,0,0,1,1,0,0,0,0,1,1,0,0,0,1,1,0,0,0,0,1,1,0,0,1,1,1,1,0}  Left Arrow
{1,1,0,1,0,0,1,1,0,0,0,0,1,1,0,0,1,1,0,0,0,0,0,1,0,0,1,1,1,1,1,0}  Up Arrow
{1,1,0,1,0,0,1,1,0,0,0,0,1,1,0,0,0,0,1,0,0,0,0,1,1,1,0,1,1,1,1,0}  Down Arrow
{1,1,0,1,0,0,1,1,0,0,0,0,1,1,0,0,1,1,0,1,0,0,0,1,0,0,1,0,1,1,1,0}  hex 2 Zoom In
{1,1,0,1,0,0,1,1,0,0,0,0,1,1,0,0,0,1,0,1,0,0,0,1,1,0,1,0,1,1,1,0}  hex b Zoom Out

Important !! Last two commands are not implemented at the official Fujifilm remote control.